Make a sustainable and fully customizable car bin!
In this easy sewing tutorial, we’ll show you how to make a reusable car bin using our VELCRO® Brand Sew On tape.
Perfect for keeping your car clean, this DIY sustainable bin can be washed and reused time after time. Perfect for long car rides or even short ones, this bin can hold all of your trash while keeping your car clutter-free!
How to make a DIY sustainable car bin
What You’ll Need:

- (1) 25cm x 50cm piece of fabric for the exterior
- (2) 25cm x 25cm coated cotton or other water-resistant fabric for the lining
- (2) 8cm x 25cm fabric for the strap
- (2) 15cm x 20cm fabric for the lid (one piece out of lining fabric and one piece out of exterior material)
- (1) 25cm x 50cm medium or heavy-weight interfacing (iron-on or sew-in) fabric
- Thread
- A ruler
- Scissors
- Pins or clips
- A sewing machine and thread
- VELCRO® Brand Sew on Fasteners
- A pen or marker
- A self-healing cutting mat
- A rotary cutter
What to do:
Straps:
- First, take your strap fabric and lay the piece on an ironing board. Fold it in half.

- Open the fabric back up and fold the edges to meet the visible crease.

- Then fold along the crease again, pin and iron.

- Sew a 3mm seam down both sides.

- To make your second strap, repeat steps 1-4.
Lid:
- To make the lid, lay both fabric pieces down on your workspace, right sides facing each other. Pin or clip together. (*OPTIONAL* to round the corners of the lid, fold the fabric in half width wise so the bottom corners meet. Then round the corners using scissors.)


- Sew a 6mm seam around the edges, leaving only a small gap in the middle of one of the long sides of the fabric to turn out.

- Turn out the lid and set aside.

Exterior Bag
- Start the bag by ironing the interfacing to the back of your 10″ x 20″ exterior fabric.

- Then, fold the fabric in half right-sides facing, and pin or clip together.

- Sew a 12mm seam down both sides.

- To create a flat bottom or box corners, place your hand inside your bag and find the bottom side seams. Flatten out the sides of the bag so the bottom hem forms a triangle. Try to make the triangles as symmetrical as possible.


- Measure 5cm down from the top of the triangle and draw a line across.

- Sew across those lines.

- Cut each corner off above the seam.

Bag Lining
- To create the lining, clip the 10″ x 10″ fabric together, right sides facing.

- Sew a 12mm seam down the sides and the bottom of the bag, leaving a 7cm opening at the bottom-center hem to turn out later.

- Repeat steps 9-11 to box the corners of the lining.


Assembly:
- Now it’s time to see your masterpiece come together! Begin by clipping the lid in the middle of one of the wider sides of the bag, right sides facing.

- Place the straps on either side of the lid. Clip in place.
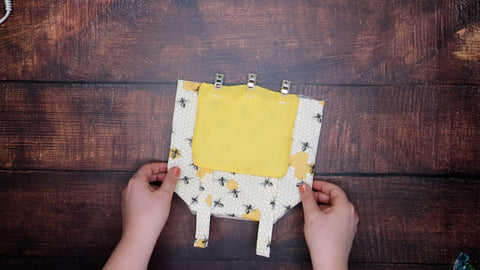
- You’re almost there! Sew the straps and lid to the bag. Go over them a few times for a studier hold.

- Turn the exterior inside out, and neatly tuck the lining inside the bag, right sides facing. Make sure the exterior’s side seams and lining fabric are aligned. The straps and the lid should be tucked between these two layers.

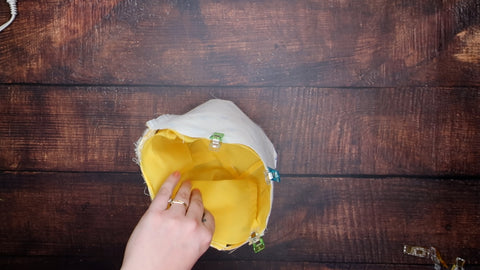
- Sew a 6mm seam around the top of the bag to join the exterior and lining together.

- Turn the bag inside out, using the open seam at the bottom of the lining.


- Sew up the hole in the lining


- Apply VELCRO® Brand Sew on fasteners to the lid as a closure.

- Apply loop side of Apply VELCRO® Brand Sew on fasteners to one strap and apply the hook side to the other strap, so they overlap.

Your DIY trash bag is finished! Now it’s time to admire your handiwork! Hang the bin over the backseat or even through the center console!
For more easy sewing projects, stay on our blog!